
*This post may contain affiliate links. As an Amazon Associate we earn from qualifying purchases.
Have you ever blown into a Nintendo cartridge? Well if you have ever owned the original Nintendo or even the N64, then I am sure you have. Maybe you are wondering if this actually works, or if this worked for anyone besides you. Well we have the answers for you as well as the pros and cons of the cartridge.
So did blowing on Nintendo cartridges work?
Although for a lot of people blowing on the cartridges did work, it was only a temporary fix. Most of the time it ended with the game stopping in the middle of gameplay, and the light flashing on the console.
If you want to know how to fix this issue permanently, you will want to keep reading this article! We will show you what has worked best, and what item we found that has always worked and saved our energy blowing on the games. You can also watch this video that shows a permanent fix for the cartridge game issues.
Are you a huge Nintendo fan? Then you have to check out the Mario and Nintendo gear that you can get. Whether you want a Mario wallet, a Nintendo sweatshirt, or a classic NES hat there are plenty of choices to choose from. You can find them all by clicking here.
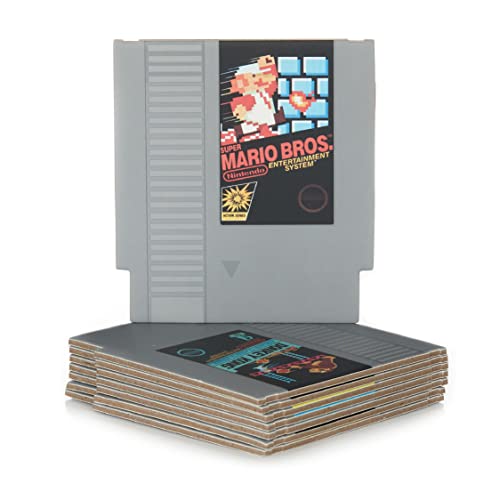
Do you love Nintendo? Then you have to check out this amazon NES cartridge drink coaster set!
This set includes 8 double sides drink coasters that look just like the classic NES cartridges.
This set is a perfect gift for the gamer in your life!
Pros and Cons of Cartridges
There are a few pros and cons of the cartridges that work on the Original Nintendo. Below are the pros and cons of the cartridges and what we found about them.
- You can sell the cartridges to anyone unlike the eShop purchases for today’s games.
- You can share and borrow games from your friends without any problem and enjoy used games for a fraction of the price without any signs of wear.
- You load the game slightly faster than other gaming consoles because the chip in the cartridges is faster and more reliable.
- The games are going to last longer than CD’s because there’s no fear of “Getting scratches”.
Now that we have looked at the pros, it is time to look at the cons of the cartridges.
- If you lose them, you won’t be able to play the game on your console without buying a new one.
- You have to physically switch them out when you want to play another game.
- You have to carry the cartridges with you, and store them in your house.
If you are wondering if you should buy a cartridge or not, you should simply look at the pros and cons and make the decision for yourself.
Do people still own original NES systems today?
Although some people like to play the new gaming systems, there are also quite a few people who prefer to play the older more nostalgic gaming systems. The original NES is one of these systems. It is an eight bit console that was released in 1985. The console was way ahead of its time, and the games were something the gaming world had never experienced before.
People in the 80’s loved the games so much that there became many avid collectors of certain games, and some of the games are still extremely popular even today! The console was boxy and simple to use, which is why the gaming community loved it so much. Unlike other complex systems, the NES was simple and allowed everyone to enjoy playing a game rather than just a few adults or teens.
The original NES had some great games that were made for it, and a lot of them are still known today by every single person. They are so popular that even people that do not game know the name of Mario, and Zelda.
There is not a day that goes by that someone does not play an original NES system, and has fun getting lost in the 8 bit world. While some people do not like the 8 bit world, when released it was far superior to other systems that were being released.
There were over 715 games that were created for the original NES. Sadly with a lot of these games having problems loading, people began to get frustrated with the NES. This problem was due to dust in the system, or gaming cartridge. It could also be caused by the 72 pins adapter in the game console somehow got bent and was not working properly.
To fix this issue some people would blow on the cartridge to get them to work. While this worked some of the time, a lot of the time it just didn’t do anything at all. Most people who actually wanted to play ended up going out and buying a Game Genie! If you are not sure what a Game Genie is, you will want to check out this short video. You can also purchase one for your system right here!
What does the Game Genie do?
Although most people used the Game Genie just as a way to get the cartridges to work, it actually could do more than that. The Game Genie gave players the capability to use cheat codes on different games. These could do anything from give you more lives, to make you bigger and stronger and upgrade your weapons. This was big for gamers in the 90’s who were playing the original NES System.
Although at the time the gamers did not have easy access to the internet, so most of them would not get the gaming codes except from gaming magazines and books that were released about the games. This is why most people would simply use the Game Genie as a way to make the cartridge work without having to blow in it.
What is the difference between the original NES and the NES Classic?
Although these two are easily confused, the original Nes and the NEs Classic are not the same console. The original NES, or simply called the NES was an 8 bit gaming system that was released in 1985 by Nintendo. The NES Classic is a remake of the NES and is actually small enough to fit in the palm of your hand.
While the NES did not have save points, the NES Classic was able to be saved anytime you wanted with the suspend points. The other main difference is that the NES Classic has wireless controllers, HDMI connection, and has built in games as the entire console is similar to the size of the cartridge game for the original NES.
Although both are very fun to play, many people prefer the NES Classic as the games are preloaded, and are considerably cheaper than the original NES with the need to purchase all the games. The NES Classic can actually be purchased right here!
Conclusion
While today’s generation probably doesn’t remember blowing in a cartridge to make it work, there are some people who prefer to actually play these games! WIth the release of the NES Classic, there are more people who know and understand these great games, even though they may not have to blow into it to get it to work. The original NES was so popular, there were far more games created for it than any other system at the time! The games are what put Nintendo over the top with creativeness, and understanding what gamers were looking for.
So if you are looking for a great game system to play, or maybe just a classic game system with a bunch of great games, you will want to check out the original NES.